کامپیوتر Computer Audio

Linux Ubuntu Audio Setup , Macbook Pro

یکشنبه 25 دسامبر 2016
/ / /
Comments Closed

این مک بوک صدای خوبی میده اما حریف CEC نمیشه . صدای CEC میکرو داینامیک خیلی خوبی داره که هیچ ترنسپورتی نداره. این ست ما مک بوک برکلی کابل پیوریست کلا 5000 دلار هست و ترنسپورت های زیادی رو میتونه بزنه ولی CEC رو نه.

جمع بندی های Computer Audio تا این لحظه:

خروجی باید همون USB باشه با کابل Purist Anniversary و دریافت کننده اسنکرون با کد گوردون یعنی همین Berkeley Alpha USB

مادربرد و cpu باید با کیفیت ساخت بالا باشند و هم زیر 15 وات باشن با سیستم عامل بسیار سبک لینوکسی مثل Lubuntu و پلیر MPD

https://en.wikipedia.org/wiki/Comparison_of_single-board_computers

برای برق باید یا باتری خیلی عالی با امپدانس خروجی کم باشه یا Power Supply خیلی خوب برای دو قسمت هم usb هم مادربرد CPU

برق سیستم خیلی مهمه. من هنوز به جمع بندی نهایی نرسیدم

اینم از لینک های بهینه کردن لینوکس برای صدای بیت پرفکت خوب :

سخت افزار زیر 15 وات با حذف I/O های اضافی و استفاده از کرنل RT یا همان Real Time لینوکس با بهینه کردن لینوکس و حذف پروسس های اضافی و استفاده از نرم افزار MPD با درایور بیت پرفکت ALSA و پریوریتی بالا.

http://www.audiohobby.com/raspberry-pi-for-audiophiles/

http://www.24bit96.com/usb-computer-audio-system/usb-audio-with-lowlatency-realtime-kernel-with-debian-and-mpd.html

https://www.techonia.com/960/install-linuxmint-macbook

http://www.head-fi.org/t/561961/bit-perfect-audio-from-linux#post_7596268

http://www.audiomisc.co.uk/Linux/ALSA/NoMoreSilence.html

http://www.alsa-project.org/alsa-doc/alsa-lib/pcm.html#alsa_transfers

http://www.head-fi.org/t/561961/bit-perfect-audio-from-linux#post_7596563

https://www.ap-linux.com/about/http://murga-linux.com/puppy/viewtopic.php?t=81984

http://www.audioasylum.com/cgi/vt.mpl?f=pcaudio&m=82175

http://www.computeraudiophile.com/f11-software/new-mpd-feature-%3D-cleaner-signal-3552/

https://www.raspberrypi.org/forums/viewtopic.php?t=12137

http://www.makeuseof.com/tag/install-linux-macbook-pro/

http://www.rodsbooks.com/ubuntu-efi/index.html

https://opensource.com/life/16/1/hacking-your-linux-computer-better-listening-experience

https://en.wikipedia.org/wiki/Comparison_of_single-board_computers

https://sites.google.com/site/computeraudioorg/linux-for-audio/setting-up-alsa

http://wiki.linuxaudio.org/wiki/system_configuration

https://www.alsa-project.org/main/index.php/Low_latency_howto

Read More

سیستم نهایی Computer Audio من

شنبه 26 نوامبر 2016
/ / /

من یه گراند مصنوعی هم تست کردم که نتیجه خوب نبود. گراند مصنوعی یه سیم داره به گراند وصل میشه و نویز روی گراند رو تبدیل به حرارت میکنه.

اینم شد سیستم نهایی من :

Macbook Pro mid 2014 Retina 13″ (USB output on right side of Macbook), 8Gig RAM, Core i5 + External HDD (Thunderbolt port)
MAC OS X Mavericks + CAD optimization Script + iTunes EQ off
Roon Labs Player Software (true Bit-Perfect mode with exclusive access) + AIFF File Format
Purist Audio Anniversary USB Cable 1.0m
Berkeley Alpha USB (Special Thanks to Mr.Gordon Rankin for Streamlength asynchronous code) + Purist Aquila AC Cable 1.5m
Purist Audio Neptune 75 ohm coax BNC Digital Cable 1.5m
EAR Yoshino DAC 4 D/A Converter + Purist Neptune AC Cable 1.5m (output volume at 2 o’clock)
Purist Audio Neptune XLR Analog Interconnect 1.0m
EAR Yoshino HP4 Headphone Amp (High Z Impedance is better for HD800) + Purist Neptune AC Cable 1.5m
purist Audio Impresa Headphone Cable 1.5m
Sennheiser HD800 Headphone

من یه PurePower که مولد برق AC هست رو حتما بیاد ایران اضافه میکنم و ممکنه در آینده یه سیستم مبتنی بر Mac mini یا PC رو با پاور ساپلای خطی امتحان کنم. همین ست آپ فعلی هم با صدای CEC هفته بعد تست میشه.

Read More

UpTone USB Regen

جمعه 11 نوامبر 2016
/ / /
Comments Closed

خب من بعد از تست Qurious با Purist Audio که دیدم Purist مطبوع تره و بعدش هم رفتم سراغ Regen و این Regen دیروز رسید تهران. حدود 175 دلاره و جیم اسمیت هم ازش استفاده میکنه. با پست USPS مستقیم اومد تهران.

USB REGEN™

اینو بعد 186 ساعت آب بندی تو سیستم خودم شنیدم . تو سیستم من Regen صدای بهتری تو بیس و کلا انتقال انرژی داره و صدای کم نویز تر و ساکت تر و واضح تری میده ولی مشکل اینه صدای Regen از نظر تایمینگ و پیوستگی جریان صدا خوب نیست. من همینجوری از خودم حدس میزنم علت اینکه Berkeley نه با iUSB 3.0 صدای خوبی میده و نه با Regen به کد های آسنکرون Berkeley برمیگرده.

خود iUSB با ورودی usb دک AMR پاسخ بهتری میداد و این Reclock ها بدرد اتصال به Berkeley نمیخورند. از نظر من پرونده Computer Audio با Setup زیر کامل میشه و در آینده فقط ممکنه یه گراند CAD برای مک بوک بگیرم و یه Purepower هم به کل مجموعه اضافه کنم.

Macbook pro 2014 Retina 13″ i5 8G RAM (Roon Software + iTunes EQ off + CAD Optimization Script) -> Purist Audio Anniversary USB 1.0m -> Berkeley Alpha USB -> Purist Audio Neptune Coax 75 ohm -> EAR DAC 4 -> Purist Neptune XLR -> EAR HP4 – > Purist Headphone Cable -> Sennheiser HD800

من پیشنهادم اینه اگر سمت Computer Audio خواستید بروید این تو ذهنتون باشه اولین چیزی که باید بگیرید و بدون اون به هیچ نتیجه ای نمیرسید همین Berkeley Alpha USB هست و بعد خرید Berkeley بقیه انتخاب ها مثل PC ویندوزی باشه یا mac mini یا imac یا مک بوک و … این ها به انتخاب خودتون باشه مشکلی نیست و کابل هارو هم تست کنید و من با پیوریست انیورسری به بهترین نتیجه رسیدم شما خودتون میتونید تست کنید و انتخاب کنید.
من iUSB 3.0 و Regen رو تست کردم و شک ندارم بقیه ریکلاکر ها و واسطه ها هم مثل Itona و Wyred 4 Sound و … هیچکدوم بدرد کار ما نمیخورن وقتی Berkeley تو مدار باشه. پس جز Berkeley پول چیز دیگری ندید و من خیلی هم تاکید دارم کابل رو Purist Anniversary بگیرید چون واقعا خوبه. الان تو تست ها Curious از همه بهتر جواب داده اما من تست کردم Curious و Audioquest و بقیه کابل هایی که تست کردم به خوبی Purist جواب نداده. فقط میمونه کامپیوتر که اونو خودتون انتخاب کنید. نرم افزار هم برای مک من Roon رو پیشنهاد میدم و بعدش هم Audirvana رو و برای ویندوز هم میتونید خودتون سرچ کنید.

مهمتر اینکه کابل برق Berkeley حتما باید خوب باشه و کامل بالای 300 ساعت هم اب بندی شده باشه. بروید تا 500 ساعت اب بندی که خیال منم راحت بشه.

My Final Config after 500 hours of break-in :
Macbook Pro mid 2014 Retina 13″ (USB output on right side of Macbook), 8Gig RAM, Core i5 + External HDD (Thunderbolt port)
MAC OS X Mavericks + CAD optimization Script + iTunes EQ off
Roon Labs Player Software (true Bit-Perfect mode with exclusive access)
Purist Audio Anniversary USB Cable 1.0m
Berkeley Alpha USB (Special Thanks to Mr.Gordon Rankin for Streamlength asynchronous code) + Purist Aquila AC Cable 1.5m
Purist Audio Neptune 75 ohm coax BNC Digital Cable 1.5m
EAR Yoshino DAC 4 D/A Converter + Purist Neptune AC Cable 1.5m (output volume at 2 o’clock)
Purist Audio Neptune XLR Analog Interconnect 1.0m
EAR Yoshino HP4 Headphone Amp (High Z Impedance is better for HD800) + Purist Neptune AC Cable 1.5m
purist Audio Impresa Headphone Cable 1.5m
Sennheiser HD800 Headphone

no ground loop in system and proper AC polarity for all components.

https://www.hifi.ir/wp-content/uploads/2016/11/IMG_9732-1.jpg https://www.hifi.ir/wp-content/uploads/2016/11/UpTone_REGEN_PCB1.1_for_web.jpg https://www.hifi.ir/wp-content/uploads/2016/11/IMG_9733.jpg Read More

Acoustic Revive USB Cable

سه‌شنبه 20 سپتامبر 2016
/ / /
Comments Closed

این کابل USB رو حتما بشنوید ، هم این کابل USB Acoustic Revive و هم کابل  Purist USB و هم کابل Oyaide (به قیمت عالیه) رو من پیشنهاد میکنم بشنوید هم USB و هم SPDIF . خودتون انتخاب کنید ولی دقت کنید قبل قضاوت باید این کابل ها رو بالای 100 ساعت آب بندی کنید. این Acoustic Revive رو از نزدیک ببینیدش واقعا خوش ساخته.

تو ایران من همین کابل هارو میتونم برای شنیدن پیشنهاد کنم.

https://www.acoustic-revive.com/english/pcaudio/usb_cable_01.html

http://www.6moons.com/audioreviews/acousticrevive2/1.html

http://www.oyaide.com/ENGLISH/AUDIO/products_category/digital_cable/pg746.html


Read More

Audio CD Ripping by Apple Super Drive – dbpoweramp Software

دوشنبه 19 سپتامبر 2016
/ / /
Comments Closed

اینطور که معلومه بهترین راه برای ریپ کردن سی دی اینه با مک و با درایو نوری خود مک بیاییم با نرم افزار dbpoweramp یک سی دی رو ریپ کنیم. تنظیماتش رو براتون میگذارم.

من لایتون 124 هم که از دید سایت Accuraterip بهترین ریپر هست گرفتم اما تو یه سایت خوندم بهترینش همین درایو اپل هست. با هر دو ریپ کردم خیلی تفاوت محسوسی حس نکردم اما حس منم اینه درایو اپل بهتره.

Read More

MacBook Pro 2014 vs CEC TL0

شنبه 3 سپتامبر 2016
/ / /
Comments Closed

خیلی تست دردناکی بود :-)))))

این CEC خوب بود ولی Macbook ما خوب صدا نمیداد. صدای CEC عمق داشت ، فول بود ، هارمونیک داشت و بالانس بود و جریان صدا راحت بود. مک بوک تیز بود بی حال بود و عمق نداشت و خسته کننده بود.

اختلاف خیلی زیاد بود.

حالا در مورد کابل Usb بخونید :

http://www.computeraudiophile.com/f8-general-forum/gordon-rankin-says-im-wrong-about-universal-serial-bus-industry-standard-cables-connectors-and-communications-protocols-between-computers-and-electronic-devices-cable-sound-20814/

الان دارم در مورد CD Ripping میخونم. اینا رو میشه استفاده کرد و برای مک dbpoweramp باید گزینه خوبی باشه:

http://www.thewelltemperedcomputer.com/KB/Ripping.htm

http://www.accuraterip.com/software.htm

How to Configure dBpoweramp for Bit-Perfect CD Audio Ripping

dbpoweramp
Exact Audio Copy (EAC)
Rip (Apple MAC)
XLD (Apple MAC)
Songbook (Apple MAC)

One of the many comparison between various rips has been made by Kent Poon.
Comparing rips made on PC and MAC using iTunes, Wavelab and EAC didn’t show any difference.
It depends on your setting. If you choose “Include pre-gap except for HTOA” mode when ripping, “Not prepended” should be chosen. If you choose “Include pre-gap for all tracks” mode, “Prepended” should be chosen.
DO NOT check the “Treat AccurateRip mismatch as an inconsistency in log” box.

در مورد سیستم usb نوشته زیر مهمه :

Gordon Rankin on why USB audio quality varies

میگه مشکل usb اینه error correction نداره. بین برندها Wavelength Audio و iFi Audio و UpTone Regen و Curious Cable روی این موضوع وقت گذاشتند. همه قسمت ها مهم میشه وقتی error correction نداریم و باید کابل با امپدانس واقعی 90 اهم باشه و فرستنده امپدانس خروجی اش مچ باشه و امپدانس ورودی ریسیور مچ باشه و بشه جلوی نویز رو بگیریم و …

خود Gordon میگه CEC داره و صدای Macbook اش بهتره (I have the CEC TL0 and it’s ok, but not nearly as good as the computer) اما باور کردن این موضوع خیلی خیلی سخته :

Via email, I posed the following question to Rankin: when I transfer a file over USB to an external hard drive it doesn’t make transfer errors – the file at the destination is the same as the source – so why should sending digital audio over USB be any different?

What came back was an epic reply. Strap yourself in – we’re going for a ride.

“While all of these interfaces (Firewire, SPDIF, USB, Ethernet, Thunderbolt so forth) have specifications. The % differential from one supplier to another in electrical, cabling, device and host seem to vary quite a bit.“

“All data moving between a host computer and a device over USB is done electrically. There are different speeds and different protocols that determine how a device and the host communicate.”

“Any interface between two points cannot be totally error free. If you use a hard drive over USB, Ethernet or Firewire there are transmission errors. That means the transmitting device is told to resend the packet that has the error in it. Most of the time this is one bit in a packet size of length X.”

“Remember, the carrier is modulated on the data so the larger X, the bigger chance of errors. Also the faster the interface the more chance that there will be an error.”

“The three main USB transmission protocols are Bulk, Interrupt and Isosynchronous. Bulk (used for data transfer to a hard drive) and Interrupt are error correcting. Isosynchronous (used for audio) is not.”

“Bulk and Interrupt are immediately NAK (negative acknowledgement). The receiver is designed to detect a bad packet immediately and the packet is resent.”

For USB audio, the receiving device is basically translating a serial stream of data with a clock interwoven throughout. At the end of the packet sits some sort of block check. If the block check does not match the data then that packet is flagged as an error.”

“With Isosynchronous USB transmission, packets are sent without any error correction / resending. But guess what? This is the USB protocol used for audio frames. The bad news is they are not error free. The good news is these Isosynchronous frames are afforded the highest priority in the system.”

“A couple of years ago, I bought an expensive Tektronix USB setup. I have had protocol analyzers since designing my first USB DACS some twelve years ago. The Tektronix is useful because it allows me to see errors better both in electrical and data packets.”

“The big thing that many people don’t realize is that not all USB ports are created equal. Not all USB cables are created equal and it’s the same for devices and even operating systems. Since getting the Tektronix I have tested probably thirty different USB cables on the fifteen computers in my lab. These computers run a variety of operating systems and the Tektronix results vary between computers even when the cable remains the same. Lets just say it’s not as pretty as I thought it would be.”

“Just a couple of things to think about in regards to USB ports. First, look to see what else is located on that tree. Each USB port can handle 127 devices. Sometimes there are additional ports hidden (inside your computer) and there are internal devices sitting on those ports – this could be the same tree that is hosting your USB DAC”.

“You can see in the lower tree, USB Hi-Speed Bus, Hub*, Hub, Apple Internal Keyboard/Trackpad, BRCM20702 Hub, Bluetooth USB Controller. On some computers, Hub* will actually be a external port and if you plugged your DAC in there you’re sharing it with all the devices below it.”

“On the PC, you can use this helpful application from Thesycon.”

“Alternatively, if you know your way around Device Manager you can go through that to find the USB tree. Although neither of these really give you a good indication of which port is on which internal hub, if you ARE able to place your DAC on a direct port you will be best served.”

“Speed plays an important part in all of this too. You may have heard the terms UAC1 and UAC2 – these are USB Audio Class protocols. UAC1 was designed for Full Speed device and host interaction. A data packet is sent every 1ms. In that packet are up to 1023 frames.”

“In high speed or UAC2 those 1024 frames each contain eight micro frames. Therefore, the amount of data we can send over UAC2 is basically eight times greater than that of UAC1. But with more data at faster speeds comes more errors and system configuration becomes harder. I almost never see an error on a UAC1 device, on a UAC2 device I can pretty much count on errors in both directions.”

“For optimum results, at least in theory, it’s best not to use a USB hard drive for your library with a USB DAC connected to the same host device. Think of it this way: your music software is reading from the hard drive in a synchronous manner and then writing to the DAC in that same synchronous manner and, as the DAC has priority, the music software might fault when reading the disk – this can lead to really bad sound.”

“Also, it’s probably best not to put the library on the system disk – because system stuff has really high priority over music playback software and again the music software can fault and bad sound will result. When a music app faults it becomes NON-bit true. One workaround for this is to choose a music app with memory buffering but in my experience even that’s not guaranteed to be 100%.”

“A good example of this is when we transitioned from Full Speed USB to High Speed USB DACs. A lot of the really expensive USB cables from audio companies failed miserably; I doubt many of these cables were even tested for High Speed compliance.”

“To summarise: the problem with USB Audio is that Isosynchronous USB frames are not error correcting. Therefore the sonic outcome of any USB system is dependent on the host to device differential.”

“Twelve years ago, I pretty much thought as many people do today: that USB was the answer to our S/PDIF quandaries. In some ways it is a good deal better. We have Asynchronous Isosynchronous so the device and host know about sample rates, bit rates, clocking options and a host of other things. But cables make a difference, computer brand and quality make a difference and even the device makes a difference.”

“I will try and capture some data errors on the Tektronix. The problem is that it does not accumulate errors. It also does not stop on errors. I have to actually push a button capture it and then pipe that to my screen.”

“What this is showing is the event table or the decoding of the USB Bus as seen by the Tektronix scope. We are using a Tektronix Differential Probe and their USB Analysis package. I made a little Male/Female HS USB board and that is plugged into a MacBook Air. I am using the Faber Acoustics Signal Scope Pro to send a 1KHz Sine wave to a Wavelength Crimson DAC @ 176.4K sampling rate. This is a program I use to test basic DACs of all kinds. This is also a pretty basic setup compared to audio transmission.”

“As per the above, a packet sent by the host to the Crimson has a CRC16 error. You can see that in the error column.”

TL;DR? What we have here is an explanation with screenshot proof that USB audio transmission isn’t bit true – enough evidence to reject any null hypothesis that assumes 1) all bits sent will all arrive intact and 2) re-transmission sorts out any detected errors. The Isosynchronous protocol used for audio data checks for errors but does not do any error correction (by way of retransmission).

Bringing it all back home, the iFi iPurifier 2 likely improves the sound of the Sonicorbiter SE because it minimises transmission errors by making lighter work for the Mytek Brooklyn’s USB receiver chip.

Furthermore, with lower noise on the line, the USB receiver chip no longer needs to kick into a higher, noise-inducing operational gear to ensure that it reads the incoming data correctly.

In other words, USB audio isn’t simply a matter of bits leaving the host PC/streamer and arriving AOK at the DAC. The quality of that which sits in-between matters.

Read More

PCM vs Delta Sigma & DSD

جمعه 29 جولای 2016
/ / /
Comments Closed

این دو روزه خیلی با Gordon ایمیل بازی کردم. یکی از بهترین طراحان USB DAC و کلی هم راهنماییم کرد. ایشون برای خیلی از شرکت ها DAC طراحی کرده و فقط روی برند خودش فعالیت تجاری نداره. جسیکا دزل که از کاربران خیلی فعال و باهوش کلاب رومی هست از DAC این طراح استفاده میکنه و خود رومی هم نوشته شنیدم اگر کسی بتونه USB رو خوب پیاده سازی کنه نتیجه خیلی عالی هست و خود Gordon هم معتقده اگر USB DAC خوب پیاده سازی بشه خیلی بهتر از SPDIF هست. کلا از SPDIF دوری میکنه.

آقای Gordon به من گفت با مک بوک پرو خودت حتما هارد اکسترنال هم بگیر که با پورت Thunderbolt کار کنه. توصیه کرد حتما از کابل خوب استفاده کنم و خودش از Audio Quest استفاده میکنه. گفته ممکنه کابل خیلی گران هم بخرید اما اون کابل USB یا SPDIF خوب نباشه. گفت از Audirvana بدون دخالت iTunes استفاده کنم. گفت پورت سمت راست مک بوک بهتره برای گرفتن سیگنال USB و برای ریپ کردن سی دی حتما error correction برنامه itunes باید فعال باشه. گفت بین فرمت های ALAC , WAVE و FLAC و … از فرمت AIFF برای مک استفاده کنم. من قبلا خونده بودم WAVE بهتره اما گوردون گفت از AIFF استفاده کنم.

اما در مورد تبدیل آنالوگ به دیجیتال :

ببینید دیتای دیجیتال یک سری 0 و 1 هست که ما تعیین میکنیم به چه شکل اون سیگنال آنالوگ به این 0 و 1 ها تبدیل بشه . دو فرمت رایج فعلی PCM و DSD هست. تو حالت PCM ما با Analog to Digital Converter میاییم با یه فرکانسی مثلا 44.1Khz اندازه ولتاژ سیگنال آنالوگ رو میخونیم و اون عدد رو به یه عدد دیجیتال تبدیل میکنیم. عدد دیجیتال محدود و قابل شمارش هست مثلا اگر 2 بیت باشه ما 4 تا عدد داریم و اگر 3 بیت باشه ما 8 حالت داریم و اگر 16 بیت باشه ما مقادیر 0 تا 65536 رو خواهیم داشت. هر بیت فقط دو حالت 0 و 1 رو میتونه داشته باشه و با n تعداد بیت ما 2 به توان n حالت داریم .

حالا برای 16 بیت ما میتونیم 65536 حالت داشته باشیم. کاری که میکنیم اینه محدوده ولتاژ آنالوگ رو که مثلا بین -2 تا +2 ولت هست رو به 65536 قیمت تقسیم میکنیم و تو تبدیل آنالوگ به دیجیتال اندازه ولتاژ به یکی از این 65536 عدد نزدیکتره و اون عدد رو براش اختصاص میدیم. مثلا ولتاژ 0 ولت میفته روی  32768 و سیستم اینجوریه که ما با فرکانس 44.1khz کلاک میزنیم و با هر کلاک 16 بیت اطلاعات رو از روی شکل موج آنالوک تبدیل به دیجیتال میکنیم. شکل زیر 3 بیت رو نشون داده.

به عبارتی معنی PCM 16-bit 44.1khz این میشه ما هر 1 تقسیم بر 44100 ام ثانیه (میشه هر 0.000022675737 ام ثانیه) 16 بیت دیتا دیجیتال استخراج میکنیم.

برای PCM 24-bit 192khz هم همین منطق هست و فقط با فرکانس بیشتری ما 24 بیت دیتا ذخیره میکنیم. عبارت PCM مخفف Pulse Code Modulation  هست.

اما در مورد DSD این طور نیست و ما با فرکانس 2.8 مگا هرتز فقط 1 بیت ذخیره میکنیم. ببینید :

تو شکل بالا ما فقط یک بیت داریم که یا 0 هست یا 1 و با فرکانس بالا 2.8 مگا هرتز سیگنال آنالوگ رو رصد میکنه و وقتی شیب تغییرات سیگنال آنالوگ زیادتره مثل نقطه شروع شکل بالا این بیت بین 0 و 1 بیشتر نوسان میکنه و هر چقدر که به قله شکل موج سینوسی نزدیک میشیم و روند تغییر دامنه ولتاژ آهسته تر میشه میبینید اون بیت دیرتر تغییر وضعیت میده و یه جورایی فرکانس تغییر اون بیت بر اساس مشتق تابع سیگنال آنالوگ هست.

همونطور که میبینید سیستم  DSD پیچیده تر از PCM بنظر میاد. به این نوع تبدیل کردن میگیم Pulse Density Modulation یا همان PDM .

Pulse-density modulation, or PDM, is a form of modulation used to represent an analog signal with a binary signal. In a PDM signal, specific amplitude values are not encoded into codewords of pulses of different weight as they would be in pulse-code modulation (PCM). Instead, it is the relative density of the pulses that corresponds to the analog signal’s amplitude. The output of a 1-bit DAC is the same as the PDM encoding of the signal. Pulse-width modulation (PWM) is a special case of PDM where the switching frequency is fixed and all the pulses corresponding to one sample are contiguous in the digital signal. For a 50% voltage with a resolution of 8-bits, a PWM waveform will turn on for 128 clock cycles and then off for the remaining 128 cycles. With PDM and the same clock rate the signal would alternate between on and off every other cycle. The average is 50% for both waveforms, but the PDM signal switches more often. For 100% or 0% level, they are the same.

تو حالت PDM میبینید که بر اساس تغییرات ما یک بیت رو تغییر میدیم و همانطور که میدانید تو آمپلی فایر های Class D هم داره چنین اتفاقی میفته و ما با تبدیل تغییرات سیگنال آنالوگ به 1 بیت اونو کد میکنیم. یعنی منطق آمپلی فایر Class D و منطق DSD و منطق Delta Sigma همگی به این برمیگردند که ما یک بیت داریم با یک فرکانس بالا و اون بیت بر اساس سرعت تغییرات فرکانسش تغییر میکنه.

حالا میریم سراغ قسمت تبدیل دیحیتال به آنالوگ.

تو قسمت اول که آنالوگ تبدیل به دیجیتال شد ما برای PCM از مالتی بیت استفاده کردیم و برای DSD از سینگل بیت و حالا راه درستش اینه که برای بازگشت از دیجیتال به آنالوگ برای PCM از DAC مالتی بیت استفاده کنیم و برای DSD از DAC سینگل بیت .

سیستم مالتی بیت واقعی همین سیستم R-2R Ladder هست که ولتاژ هر بیت به یک مقاومت پسیو وصل میشه و تو خروجی از جمع ولتاژها سیگنال آنالوگ کاملا خطی ساخته میشه. به این حالت میگن True Multi-bit یا همان R-2R Conversion .

اینم شکل دیگر :

این حالت عالیه و رومی و تورستن هم موافق همین سیستم True Multi-bit هست. مقاله MSB و Lampizator رو بخونید جالبه :

http://www.mother-of-tone.com/conversion.htm

http://www.msbtech.com/support/dac4_vince.php?Page=supportHome

http://www.msbtech.com/support/How_DACs_Work.php?Page=supportHome

http://www.lampizator.eu/Fikus/R2R_DISCRETE.html

نکته اینه قدیما از مقاومت استفاده میشد بعدش Analog Device و Philips و Burr Brown اومدند و همین سیستم r2-r رو داخل یک چیپ پیاده سازی کردند.

The TDA chip is nothing but a ladder of several hundred resistors built in the form of integrated circuit (silicon chip) and hence miniaturized to a reasonable size, usable in home electronics. This type of DAC chips is called multibit or R2R. (resistor to resistor)

اون analog Device اومد AD1865 رو زد و Philips مدل TDA1541 رو زد و Burr Brown هم مدل PCM1704 رو زد. بعدش دیگه کلا بساط R2R برچیده شد .

The absolute peak of R2R was the chip from Burr Brown (Japan) (later acquired by Texas) called PCM1704, with close followers of Philips’ TDA1541A, (and 1547) Analog Devices AD1865 and the Burr Brown’s own PCM 63. These chips are considered the pinnacle of the PCM era and were all discontinued about 20 years ago.

این DAC ها همشون برای 44.1khz و 16 بیت بودند و برای فرکانس های بالاتر و بیت بیشتر ورژنی ندادند. البته فک کنم PCM1704 تا 96 کیلوهرتز هم میره با 24 بیت. خود Lavry برای DAC 2002 مجبور شد از همون مقاومت ها استفاده کنه برای فرکانسهای بالاتر و 24 بیت.

از AD1865 شرکت Audio Note استفاده میکنه ، از TDA1541 شرکت AMR و Zanden استفاده میکنند ، از PCM1704 هم چند شرکت محدود دیگه. شکل زیر شبکه مقاومت هارو ببینید :

لیست DAC های مالتی بیت :

CEC DA 0 3.0
Trinity DAC
Ypsilon DAC 100
Phasure NOS1 DAC
MSB Platinum
Total DAC
Audial DAC Model S (Pedja Rogic)
AMR top DAC and CD-77 (Thorsten Loesch)
Lampizator
Wavelength USB DAC
Exasound
Reimyo
CH precision

Acoustic Plan

Zanden Audio
Audio Zone DAC-1

Audio Note UK

ادامه دارد …

Read More

Wavelength Audio Wavelink HS 24/192

پنج‌شنبه 28 جولای 2016
/ / /
Comments Closed

این DAC 4 شرکت EAR احتمالا نیاز به یه رابط SPDIF داره. من بین همه این رابط ها از WaveLink HS خوشم اومده که در زیر میبینید :


Wavelength Audio – WaveLink HS 24/192 USB to SPDIF converter $900

  • Streamlength Asynchronous USB
  • XMOS USB receiver
  • Sampling Frequency : 44.1kHz, 48kHz, 88.2kHz, 96kHz, 176.4khZ, 192kHz
  • Bit depth: 16/24
  • Output: S/PDIF (BNC)
    Included is BNC-BNC SPDIF cable and with a mating BNC->RCA adapter
  • Thesycon USB Class 2 Audio driver (Windows)
Read More

در ادامه DAC و Computer Audio

چهارشنبه 27 جولای 2016
/ / /
Comments Closed

اول این لینک هارو دقیق بخونید خیلی خوبن :

http://www.stereophile.com/content/pdm-pwm-delta-sigma-1-bit-dacs#uvK84ec8zX22B853.97
http://www.thewelltemperedcomputer.com/index.html
http://www.mojo-audio.com/blog/

Thorsten Loesch
http://www.audiostream.com/content/qa-thorsten-loesch-amrifi#lj9GAqmbHhKALb2T.97

Gordon Rankin
http://www.audiostream.com/content/qa-wavelength-audios-gordon-rankin#H5fQlcaW35sB3Gl2.97

http://www.6moons.com/audioreviews/wavelength2/brick_2.html

John Swenson
http://www.audiostream.com/content/qa-john-swenson-part-1-what-digital#mh5Q2RTVxyOBCJRK.97
http://www.audiostream.com/content/qa-john-swenson-part-2-are-bits-just-bits
http://www.audiostream.com/content/qa-john-swenson-part-3-how-bit-perfect-software-can-affect-sound

Steve Nugent
http://www.audiostream.com/content/qa-steve-nugent-empirical-audio

Benjamin Zwickel
http://www.mojo-audio.com/blog/computer-audio-misconceptions/

Pedja Rogic
https://www.audialonline.com/topics/

http://www.monoandstereo.com/2008/04/interview-with-pedja-rogic-of-audial.html

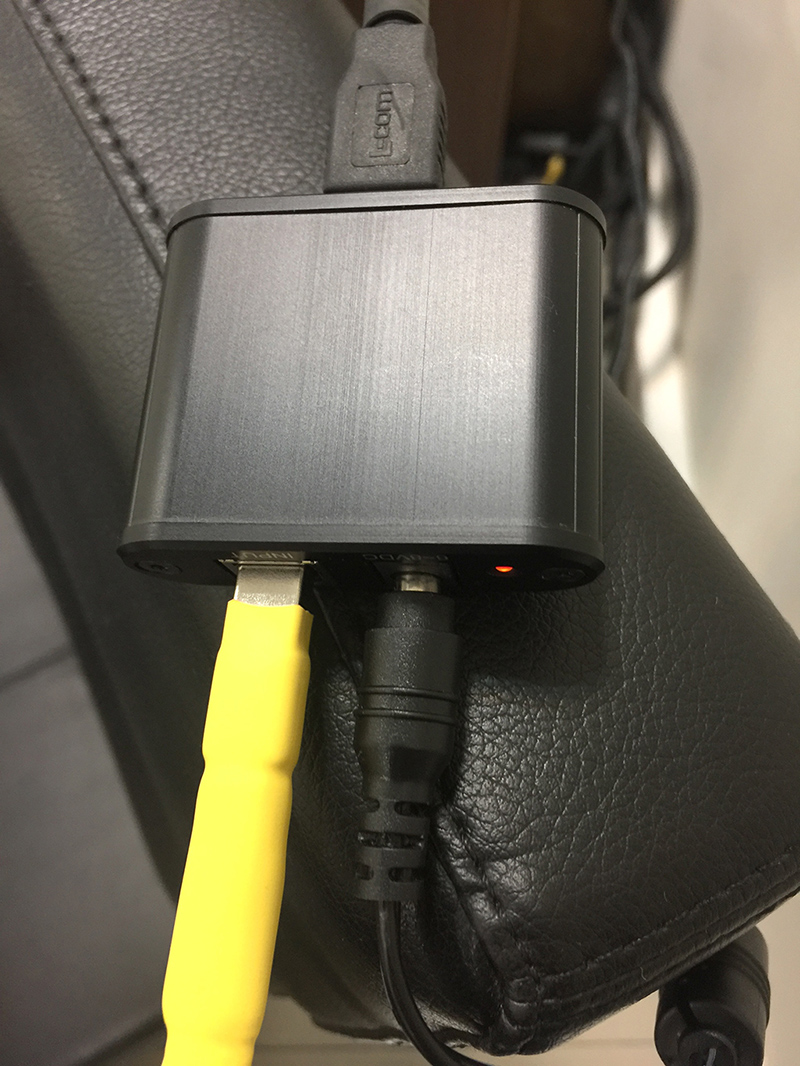
این روزها در مورد DAC و موضوع حذف نویز و جیتر از PC میخونم. تورستن و گوردون و ژان و استو بیشترین تحقیقات رو تو زمینه گرفتن بهترین نتیجه از PC داشتند با ارتباط USB . دو مورد هست یک ایزوله کردن (Galvanic USB Isolation) گالوانیک نویز PC از DAC که هر چقدر ایزوله تر باشه بهتره اما با امکانات این صنعت (دو راه یکی کوپل نوری که جیتر بیشتری داره و دیگری استفاده از چیپ های Analog Device مثل ADUM4160 که هم محدودیت 96کیلوهرتز دارند و هم جیتر بیشتر) عملا هر چقدر ایزولیشن بیشتر بشه جیتر هم بیشتر میشه و موضوع مهم دیگر برای صدای خوب حذف و کاهش جیتر که اونم کار راحتی نیست.

First isolation is a good thing to have. I run a CG filter from my main power and put all the computer stuff on one side and all the analog on another. That way the switching computer noise has 2 filters to jump thru before it gets to the analog side.

I isolate at the I2S level. We found over the years that this was the best place for it. We reclock all the signals on the DAC side so the jitter is very low.

Using the Analog Devices ADUM series… well requires some engineering. First it is not setup to drive cables. These chips were meant to be on the board of the isolating endpoint. They also don’t sound that good… not sure why… maybe the same reason some USB cables don’t sound good. They are limited in speed to Full Speed or 24/96.

Most of the current asynchronous or even adaptive have no isolation. Anything that is self powered cannot have isolation…. well SPDIF converters can because they can have a transformer or optical output. But then again as pointed out above SPDIF leads to more jitter. This does not mean they are bad. These just may require a little more setup and adjustments than those that are.

I really would not get hung up on this as much as getting something that sounds good to you. Visit a dealer or have a dealer send you something to hear. Don’t buy by numbers or what people say here. Nobody listens the same or has the same system, room etc…

have fun!
Gordon

فعلا با نتایج من تو اینترنت بهترین حالت Computer Audio گرفتن دیتا از asynchronous usb کامپیوتر هست.

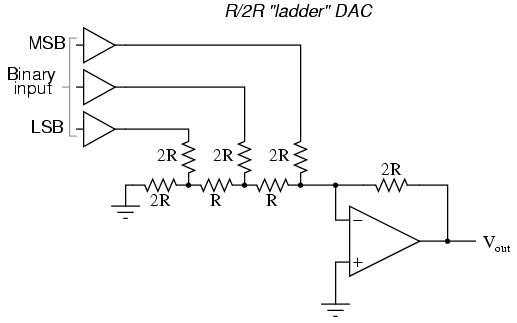
DAC بهتره و شاید لازمه که True Multi-Bit باشه یعنی از سیستم R-2R استفاده کنه و نه از سیستم Delta Sigma و حتی اگر عبارت Multi-Bit رو قبل Delta Sigma دیدید بدونید اون دک مالتی بیت واقعی نیست.

https://www.hifi.ir/wp-content/uploads/2016/07/Best-Performance.pdf

http://www.mojo-audio.com/blog/optimizing-os-x-yosemite/

Introduction:

So you have an Apple computer running OS X Yosemite and you want to optimize performance. I’ve got you covered. If you prefer to run an older version of OS X, I have another optimization blog that covers Snow Leopard through Mountain Lion.

Less is more…

It’s obvious Steve Jobs is dead. Forget about the fact that when Yosemite was first released it had so many bugs and conflicts you would think it was engineered by Microsoft. Apple was on the cutting edge of professional audio and video production, photography, and CAD, but has now redirected their marketing efforts toward the average social networking, iCloud using, multiple mobile device consumer.

Yosemite emphasizes a plethora of “eye candy” aesthetic features, automated multi-device and multi-platform integration, and organizational apps such as Mission Control, Dashboard, and Widgets.

The more of these optional processes you remove, the more you’ll improve Yosemite’s performance.

My company, Mojo Audio, manufactures and sells high-end computerized music and video servers for the home theater enthusiast and recording/editing professional. Though this blog was written to assist our customers in optimizing the performance of Yosemite running on their upgraded Mac Mini media servers, these same optimizations will work on any Mac running Yosemite.

I’ll walk you through exactly what you need to do to disable memory resident programs that automatically load by default when Yosemite boots up. And I’ll also show you how to turn off optional wireless control interfaces, such as infrared, WiFi, and Bluetooth.

When you disable these optional processes and reallocate system resources, your computer does less switching, swapping, interrupting, and error correcting. Freeing up system resources and turning off unused wireless control interfaces results in noticeably more efficient performance which translates to a more fluid and coherent audio and video presentation.

Warning! I recommend that before making any changes or updating software in any computer that you backup your drives. Using “cloning” software, such as Carbon Copy Cloner, creates a bootable backup.

It’s a perfect use of your time . . . you can clone your drives while you review the rest of this guide.


Start with a clean install of Yosemite:

It’s often easier to start with a clean slate than to figure out how to turn off and undo things we may have unknowingly turned on.

You did remember to back up your data and boot drives, right?

When you do a clean install you’re going to erase everything, so now’s a good time to make and test (yes, test) your system backups.

Warning! When doing a clean install do not activate any automated features. Activate only one web browser, preferably Safari. Don’t activate any optional features or plug-ins, such as Google Chrome. BTW, Chrome and Yosemite don’t play nice together, so I wouldn’t recommend using Chrome under any circumstances.

Here is a link to a guide on how to do a clean install.

Now that you’re back to clean, and nothing optional has been added, I’ll show you how to turn off a series of default resident processes that automatically boot up with Yosemite.


Improve Safari performance:

Safari does all sorts of things automatically to enhance your browsing experience. Of course, anything automatic consumes system resources. One option would be installing software, such as ClicktoPlugin, that prevents Safari from automatically loading plugs-ins.

Software like ClicktoPlugin not only speeds up browsing, but also reduces fan speed and extends battery life. It also improves performance of audio and video streaming.

The way it works is that it replaces any plug-in object with an unobtrusive placeholder that can be clicked on to load the embedded content of the plug-in. Now plug-ins only activate manually.

Another option you have instead of or in addition to using a plug-in management Application would be to uninstall Adobe Flash. Without Flash and plug-ins, Safari performs better.


Clear your desktop:

Remove any files, folders, or infrequently used Dock icons. These convenience and organizational options slow down performance by requiring the system to constantly redraw them on the screen.

Remove from Dock

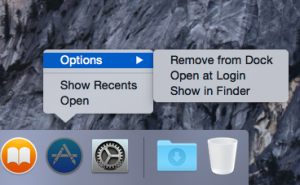
For a minimized Dock, the only icons you need are Finder and Trash. The rest of the icons can be deleted. Some people like to keep Launchpad in their Dock for easier access to Applications.

Launchpad

To keep icons in your Dock, opposite click on the icon and select Keep in Dock. If you use an Application all the time and want it to open whenever you restart your computer, just opposite click on the icon and select Open at Login.

Other Keep 2

If you are optimizing for audio or video, you want your player and/or recording software to automatically open at Login. For desktop use, this could be accounting software, CAD software, and/or a web browser.

Applications automatically opening when the computer restarts is very important to restore function for media servers or home automation.

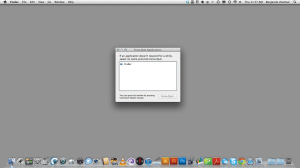
Close all Applications

Before applying any optimizations, make certain the only application running is Finder.

The Force Quit window will allow you to view all applications that are running.

Go into the  Apple Menu, drop-down menu, and select Force Quit.

Click to Enlarge

Click on and highlight an application. Press the Force Quit button in the lower right corner. Repeat until the only application shown is Finder.

Click to Enlarge


Disable pretty and automatic:

Disabling “eye candy” such as Transparency and turning off automated features such as Widgets will improve Yosemite performance.

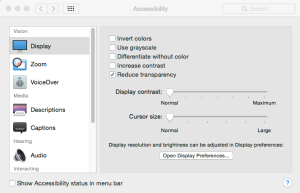
Reduce Transparency:

Go into the  Apple Menu, select System Preferences, and click on Accessibility.

Yosemite System Preferences

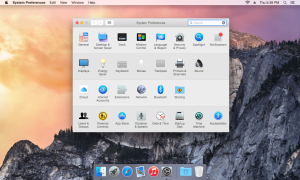
In the Accessibility window, check the Reduce Transparency box.

Reduce Transparency

Change Minimize Windows to Scale:

Any effect that is used when minimizing windows unnecessarily consumes system resources.

Go into the  Apple Menu, select System Preferences, and click on Dock. Change the Minimize windows from Genie effect to Scale effect.

Dock

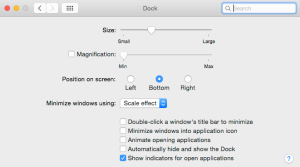
Uncheck the Animate opening applications box. You can check or uncheck any of these features. Remember: less is more.

Disable Widgets:

Widgets are cool looking and convenient, but they use quite a bit of system resources. Not updating Widgets significantly speeds up rebooting and improves performance. Click on the Widgets toggle in the upper right corner.

Widgets 2

Uncheck, deactivate, and remove as many items as possible from both the Today and the Notifications panels.

Disable the Extensions that you don’t need:

Go into the  Apple Menu, select System Preferences, and click on Extension.

Extensions

Go to the Today options in the left column and uncheck any or all extensions you don’t require.

Disable sleep, Power Nap, and screen saver:

Go into the  Apple Menu, select System Preferences, and click on Energy Saver.

Energy Saver

Uncheck everything except Prevent computer from sleeping automatically and Start up automatically after a power failure. Move the Turn display off after slider to the far left set to Never.

Disable Notifications:

Go into the  Apple Menu, select System Preferences, and click on Notifications.

Notifications

In the left column click on and highlight the Do not disturb option and uncheck as many boxes as possible.

Notifications 2

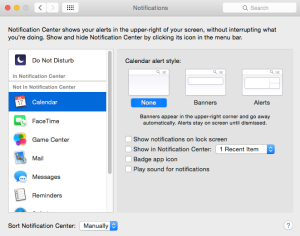
In the left column click on and highlight each of the features (Calendar, Face Time, Mail, Messages, etc) and uncheck as many boxes as possible. Change to 1 recent item for each feature.

Speed up new Finder window generation:

In the Finder pull down menu select Preferences.

Finder Preferences 2

Set the New Finder windows show to the place you go to most often. This could be Desktop, Documents, Music or your user home folder.

Finder Preferences

You can also control several other aesthetic features by checking or unchecking these features.

Removing unused languages:

Go into the  Apple Menu, select System Preferences, and click on Languages & Region.

Language

Make certain that only the language(s) you use are listed. Highlight and delete unused languages and add any languages you may need using the + and – buttons.

Removing the presentation order for Spotlight:

Go into the  Apple Menu, select System Preferences, and click on Spotlight.

Spotlight 2

In the Spotlight control window, select the Search Results tab.

Spotlight

You’ll see a list of Applications with check boxes next to them. Uncheck all of the boxes. There is no point in leaving “Music” for a music or media server because your library/player software doesn’t access through Spotlight.

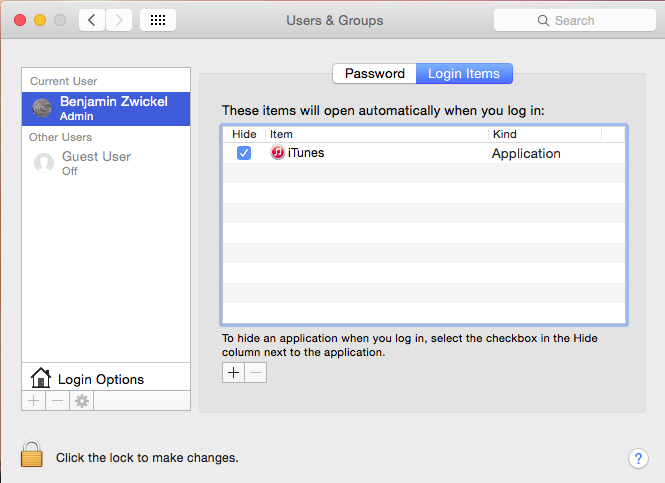
Disabling Login Items:

Ideally you want only one Application to automatically open when you login to your computer. If you use your Mac as a dedicated music server, you would want only your player software to open at Login. If you are a professional, you would want your accounting software, CAD software, etc. to automatically open at Login. At the same time, you want to disable any other applications that may automatically want to open at Login.

Go into the  Apple Menu, select System Preferences, and click on Users & Groups. To streamline the Login items click on the Login Items tab at the top.

Users & Groups 3

Note: This is the same window you can add guests and users with restricted access. For example, you could allow your children to log on to your media server and play recordings from your NAS drive, but not have access to change any of your administrative settings.

You’ll see all the Applications you’ve set to automatically open at Login in the main window. You can remove any optional automated fluff Apps, such as iTunes Helper, to improve system performance.

Users & Groups

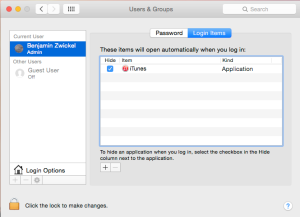
I recommended that you upgrade iTunes with a high-performance music/media player Application.

Disabling Automatic Software Update:

Go into the  Apple Menu, select System Preferences, and click on App Store. Uncheck the Automatic Updates box.

App Store 2

Note: This is the same place you can manually check for updates.

I cannot recommend more strongly that before updating you always make and test (yes, test) a backup of your drives.

App Store

Often updates have bugs or conflicts with drivers. Having a bootable backup allows you to easily return to your former working system, when as is quite common, an update screws up your computer : P

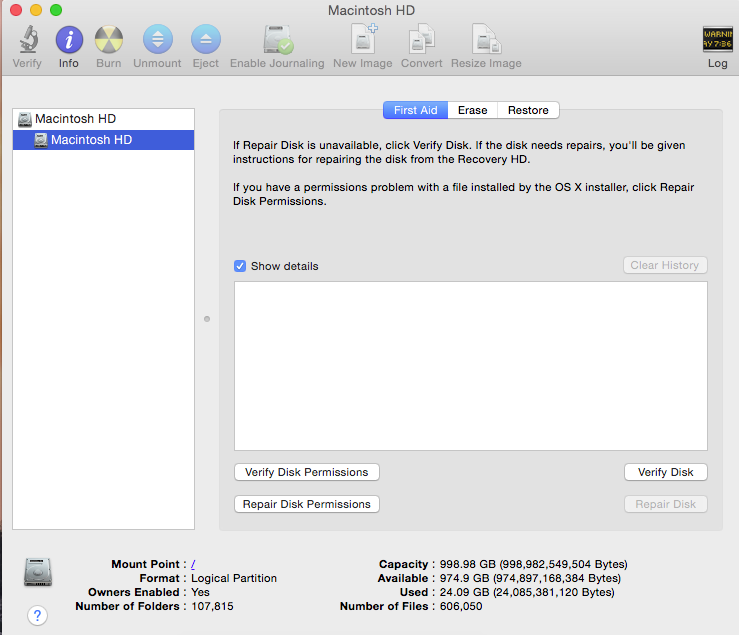
Repairing disk permissions:

For optimal system performance, Repair Disk Permissions after you do OS X updates, do Application updates, or transfer large quantities of data. This is a good habit to get into.

You can find Repair Disk Permissions in your Disk Utility Application.

Launchpad

Activate your Launchpad. Disk Utility is located in your Other folder.

Yosemite Other

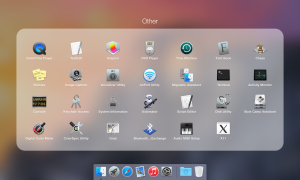
Note: use the Escape key on your keyboard to return from the Other folder to the rest of your Launchpad Applications.

Disk Utility 3

To Repair Disk Permissions, simply highlight the disk you want to repair.

Disk Utility 2

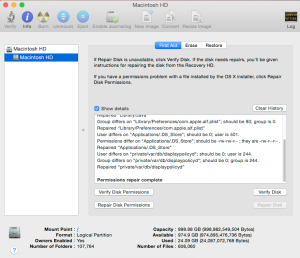
When repairing disk permissions is done, you will see Permissions repair complete at the bottom of the Show details window.

Disabling the Time Machine automatic backup:

Go into the  Apple Menu, select System Preferences, and click on Time Machine.

On the left side of the window, you’ll see a slide selector that has off at one end and on at the other. Make sure the selector is switched off.

Time Machine

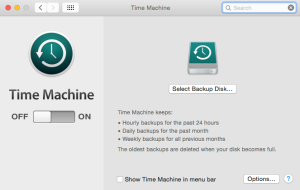
Warning! Your drive will inevitably fail: back up often. Using a bootable backup will save you a significant amount of time when you have to reinstall your boot drive.

Disable the automatic journaling feature:

Just as before, launch Disk Utility by activating Launchpad, clicking on the Other folder, and selecting the Disk Utilities icon.

Individually select any drive on the list. Hold down the Option button on your keyboard and click on the File drop-down menu. Slide down the File drop-down menu and select Disable Journaling. If you don’t hold the Option button down while selecting the File drop-down menu, Disable Journaling will not be a selectable option.

Disable Journaling

Repeat this for all drives.

If you wish to enable the automatic journaling feature for a drive, simply repeat the above process and select Enable Journaling in the same drop-down menu.


Turn off wireless control interfaces:

Turning off unused wireless control interfaces, such as WiFi, Bluetooth, and Infrared, improves performance by freeing up system resources and reducing data corruption caused by EMI “noise” on sensitive internal circuitry.

Systems Mojo Audio sells with our optimized Yosemite have Infrared turned off because it’s rarely used and Bluetooth and WiFi turned on since they are often used to set up new systems. I recommend turning off as many wireless control interfaces as possible.

Warning! Turning off wireless control interfaces can disable control devices, such as your Apple Bluetooth keyboard/mouse/pad. I recommend a USB keyboard and mouse for setup and troubleshooting.

For highest performance use no wireless control interfaces:

  • Connect to the internet via Ethernet cable on a LAN.
  • Control your desktop computer with USB control devices.
  • Use your laptop’s integrated monitor/keyboard/pad.
  • Use cables to transfer data between computers and devices.

The second-best option is to use only one wireless control interface.

Let’s start by looking at what works with what so you’ll have a better idea of which wireless control interfaces you’ll want to turn off.

Control devices associated with wireless interfaces:

  • Most keyboards and mice = USB (wired or wireless)
  • Apple keyboard and mouse = Bluetooth
  • Apple and aftermarket remote controls = Infrared
  • iOS and mobile device remote control = Bluetooth
  • iOS and mobile devices remote desktop App = WiFi

The above list may differ from brand to brand or App to App and may even change over time. I recommend connecting a simple USB keyboard/mouse/pad and turning on/off wireless control interfaces one at a time and testing each of your control devices to confirm which works with which.

Note: Wireless devices that plug into USB have relatively low noise compared to WiFi or Bluetooth because they have external receivers, cause less EMI noise, and are better shielded from internal circuitry.

Turning on/off the infrared:

Go into the  Apple Menu, select System Preferences, and click on Security & Privacy.

System Preferences

Click on the Advanced button.

Security & Privacy

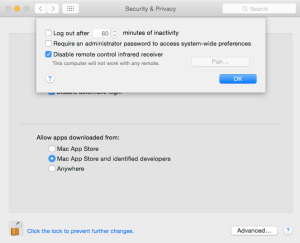
Off: Check the box next to Disable remote control infrared receiver. On: Uncheck this same box to activate the infrared receiver.

If a windows Lock icon is in the locked position, you must unlock it before making any changes. To unlock any window, click on the Lock icon; you’ll be prompted to enter your administrative password.

Note: The password for any Mojo Audio optimized system is “Mojo.”

Turning on/off the WiFi control interface:

Go into the  Apple Menu, select System Preferences, and click on Network.

WiFi Networking 2

Click on and highlight WiFi in the left column:

Off: Click on the Turn WiFi Off button. On: Click on the Turn WiFi On button.

Note: The color of the dot on the left of the networking interface goes from green to red when an interface is turned off and returns to green when turned back on.

Turning on/off the Bluetooth:

Go into the  Apple Menu, select System Preferences, and click on Bluetooth. Click on the Bluetooth status button. Note the status changes.

Bluetooth 2

Click on the Advanced button and additional Bluetooth options appear. Check or uncheck the options you want. Personally I uncheck them all.

Bluetooth

Note: So that Apple keyboards/mice/pads work with our new systems we leave the Bluetooth on. I would recommend switching to a simple USB keyboard/mouse/pad and turning all the Bluetooth off.


Deactivate processes using Terminal:

Warning: incorrectly entering code in the Terminal Application can permanently disable your computer. It could require that you reformat and reinstall your entire boot drive.

Did you test your bootable backup? Always a good idea.

The Terminal application is a text-driven command-line interface that allows you to communicate directly with the Unix-based operating system at the core of OS X Yosemite. Unix is the lowest possible level of human interface above machine language, giving the most streamlined and direct control over Yosemite.

I’ll show you how to use Terminal to remove Apps and processes that are set running by default when Yosemite boots up .

To launch the Terminal application, activate Launchpad, go into the Other folder, and click on the Terminal icon. The Terminal interface will appear. Now you are ready to enter commands into the command-line.

Yosemite Other

Tip: To minimize the potential for error, I recommend you copy the commands and paste them into the Terminal’s command-line.

Terminal

Remove Mission Control: copy/paste the following lines into Terminal’s command-line one at a time and hit the Enter key after each one:

defaults write com.apple.dock mcx-expose-disabled -bool TRUE [Enter]

killall Dock [Enter]

Remove Dashboard: copy/paste the following lines into Terminal’s command-line one at a time and hit the Enter key after each one:

defaults write com.apple.dashboard mcx-disabled -boolean YES [Enter]

killall Dock [Enter]

Remove Spotlight: copy/paste the following into Terminal’s command-line and hit the Enter key:

sudo launchctl unload -w /System/Library/LaunchDaemons/com.apple.metadata.mds.plist [Enter]

In order for the following command to take effect you’ll be required to enter your administrative password and hit the Enter key.

Note: The password for Mojo Audio optimized systems is: “Mojo.”

Remove Automatic Termination: copy/paste the following into Terminal’s command-line and hit the Enter key:

defaults write -g NSDisableAutomaticTermination -bool TRUE [Enter]

Finder is the main organizer in Yosemite. Unlike most applications which you can quit or Force Quit, the default settings in Yosemite will allow you to relaunch but not to actually quit Finder.

Terminal 2

Resetting Yosemite to quit  Finder: copy/paste the following into Terminal’s command-line one at a time and hit the Enter key after each one:

defaults write com.apple.finder QuitMenuItem 1 [Enter]

killall Finder [Enter]

Important! Quit the Terminal Application.

To maintain optimal performance, each time you reboot your computer, and each time you use Finder, you will need to follow the instructions below to manually quit the Finder Application. Since Yosemite needs at least one Application to be open before you can quit Finder, you’ll need to open your player or primary software first.

Click on the Finder icon in the dock.

Select the Finder column in the top drop-down menu next to the  Apple Menu in the upper left corner of your screen.

Quit Finder

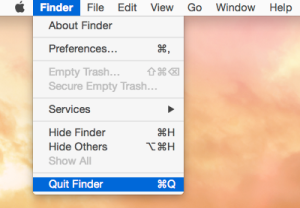
Slide down to the bottom row and select Quit Finder.

You’ll know Finder is not running if the dot under the Finder icon in the dock is gone.


Reactivate processes using Terminal:

Reactivate Dashboard: copy/paste the following into Terminal’s command-line one at a time and hit the Enter key after each one:

defaults write com.apple.dashboard mcx-disabled -boolean NO [Enter]

killall Dock [Enter]

Reactivate Mission Control: copy/paste the following into Terminal’s command-line one at a time and hit the Enter key after each one:

defaults write com.apple.dock mcx-expose-disabled -bool FALSE [Enter}

killall Dock [Enter]

Reactivate Spotlight: copy/paste the following into Terminal’s command-line and hit the Enter key:

sudo launchctl load -w /System/Library/LaunchDaemons/com.apple.metadata.mds.plist [Enter]

In order for the following command to take effect you will be required to enter your administrative password and then hit the Enter key.

Reactivate Automatic Termination: copy/paste the following into Terminal’s command-line and hit the Enter key:

defaults write -g NSDisableAutomaticTermination -bool FALSE [Enter]

Reactivate Finder: copy/paste the following into Terminal’s command-line one at a time and hit the Enter key after each one:

defaults write com.apple.finder QuitMenuItem 0 [Enter]

killall Finder [Enter]

Important! Quit the Terminal Application.


Perform periodic maintenance:

To maintain the highest level of performance and security, you must periodically do a few tasks manually:

  • Turn off the Finder application every time you open or reboot.
  • Close applications other than your player or primary software.
  • Clone or back up your media and documents as they change.
  • Repair disk permissions every time you rip or download files.
  • Update software only as needed – if it’s not broke, don’t fix it.
  • Always clone or back up your boot drive before updating.
  • Repair disk permissions after updating or installing Apps.

If you like what you read in this blog and are interested in getting more free tips and tricks, sign up for Mojo Audio’s Audiofiles blog. Also, sign up for our e-newsletter to get more useful info as well as coupons, special offers, and first looks at new products.

Plus, don’t forget to “like us” on Facebook.

Enjoy!

Benjamin Zwickel

Read More

Asynchronous USB looks to be the perfect solution

پنج‌شنبه 21 جولای 2016
/ / /
Comments Closed

این متن عالیه :

http://www.thewelltemperedcomputer.com/KB/USB.html

http://www.empiricalaudio.com/computer-audio/technical-papers/

USB

Universal Serial Bus (USB) is a serial bus standard to interface devices. USB was designed to allow many peripherals to be connected using a single standardized interface socket and to improve the plug-and-play capabilities by allowing devices to be connected and disconnected without rebooting the computer (hot swapping). Other convenient features include providing power to low-consumption devices without the need for an external power supply and allowing many devices to be used without requiring manufacturer specific, individual device drivers to be installed.

http://en.wikipedia.org/wiki/USB

A nice story about the development of the USB interface: The D/A diaries: A personal memoir of engineering heartache and triumph by Hitoshi Kondoh.

USB is a computer bus like any other but for some reason it inspires people to make all kind of funny products.

Wedding

USB wedding ring

Introduction

USB audio is very popular.
One of the reasons is that USB audio is part of the USB standard and as a consequence native mode drivers are available in all the popular OS (Win, OSX and Linux).
Connecting a USB audio device is a matter of plug&play.

USB audio is a flexible solution as any PC offers USB.

If you use a laptop this is probably the way to go if you want to improve on the on-board sound card.

The audio is routed to the USB.
This is a matter of choosing the USB audio device in your media player.
The on-board sound card is bypassed; in fact you don’t need a sound card at all.

The USB audio device is your (outboard) sound card.


Today the resolution of USB audio ranges from 16 bit/ 32 kHz to 32 bit/ 384 kHz.
A lot of DACs are still limited to 16 bit/ 48 kHz max.


The data transfer from the PC to the DAC can be done in adaptive or in asynchronous mode.
In adaptive mode the DAC adjust its timing to the rate the data is pouring in.
In asynchronous mode the DAC keeps its timing constant and controls the amount of data send by the PC. By design asynchronous mode eliminates input jitter.

Resolution

A lot of people think USB audio is limited to 16 bits/48 kHz max.
A lot of (cheap and sometimes not so cheap) USB DACs are indeed limited to this resolution.

This is because the manufacturer decided to use a simple and cheap of the shelf hardware solution.

Another common misunderstanding is the specification of the bus (USB 1,2 or 3) and the USB audio standard (1 or 2).

USB Audio Class 1 standard (1998)

This standard allows for 24 bits/96 kHz max.
The standard itself doesn’t impose any limitation on sample rate.
Class 1 is tied to USB 1 Full Speed = 12 MHz
Every millisecond a package is send.
Maximum package size is 1024 bytes.

2 channel * 24 bit * 96000 Hz sample rate= 4608000 bits/s or 576 Byte/ms
This fits in the 1024 byte limit.
Any higher popular sample rate e.g. 176 kHz needs 1056 bytes so in excess of the maximum package size.


All operating systems (Win, OSX, and Linux) support USB Audio Class 1 natively.
This means you don’t need to install drivers, it is plug&play.
All support 2 channel audio with 24 bit words and 96 kHz sample rate

USB Audio Class 2 standard (2009)

It is downwards compatible with class 1.
USB Audio Class 2 additionally supports 32 bit and all common sample rates > 96 kHz
Class 2 uses High Speed (480 MHz). This requires USB 2 or 3.
As the data rate of High Speed is 40 X Full speed, recording a 60 channel using 24 bits at 96 kHz  (132 Mbit/s) is not a problem.

From mid-2010 on USB audio class 2 drivers are available in OSX 10.6.4 and Linux.
Both support sample rates up to 384 kHz.
It is unclear if Microsoft is going to support USB Audio 2.
You need a third party USB class 2 driver on Windows.

Companies like Thesycon or Centrance have developed  a USB Class 2 Audio driver for Windows.

Using High Speed USB for playback  there are no limits in resolution.

USB Speed

  • Superspeed – 10 Gbps USB data rate (USB 3.1)
  • Superspeed – 5 Gbps USB data rate (USB 3.0)
  • High Speed – 480 Mb/s with a data signalling tolerance of ± 500ppm (USB 2).
    This means every 125 µs a SOF packet arrives with a allowed deviation of ± 0.0625 µs..
  • Full Speed – 12 Mb/s with a data signalling tolerance of ±0.25% or 2,500ppm. (USB 1&2)
    This means every 1ms a SOF packet arrives with a allowed deviation of ± 500ns.
  • Low Speed – 1.5Mbits/s with a data signalling tolerance of ±1.5% or 15,000ppm (USB 1&2)

USB receivers

The data send over the USB must be transformed to a format a DAC (the chip doing the DA conversion) does understand. This can be SPDIF or I2S.
This is the task of the receiver chip.

Adaptive mode 16 bit units often use the Cmedia or TI (PCM270x) based chip sets. These are not programmable and usually only support 16 bit  and 32, 44.1, 48 kHz sample rate.

An example of how this chip-set performs compared with asynchronous USB can be found below.

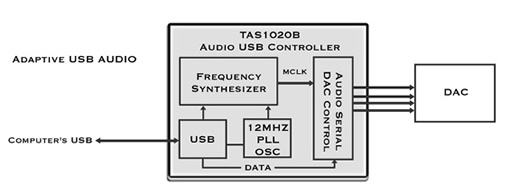
24 bit adaptive mode DACs needs a programmable design (TAS1020 or other USB Audio Controller).

This chip enables 24 bit/ 96 kHz over USB.

Chips like the TAS1020 are limited to full speed.

You can’t do high speed as needed for USB audio class 2.

96 kHz is the upper limit when using native mode USB Audio Class 1 drivers.

A USB audio class 2 or a custom driver is needed to run 176/ 192 kHz and higher.

An example is the Tenor TE8802L by Galaxy Far East Corp.


  • USB2.0 Audio Class v2.0 and v1.0
  • 2-Inputs support by one I2S pairs with 128/256 Fs.
  • 2-Output support by one I2S pairs with 128/256 Fs
  • Adaptive/Asynchronous Mode supported
    • High-Speed mode support Adaptive/Asynchronous
    • Full-Speed mode support Adaptive only
  • Resolutions support 16/ 24Bit with sampling rates support 44.1/48/88.2/96/176.4/192KHz
  • Built in one IEC60958 professional 24 bit/96KHz S/PDIF RX, with I2S pins as well.
  • Built in one IEC60958 professional 24 bit/192KHz S/PDIF TX, with I2S pins as well.


Today you can buy complete USB-receiver modules like XMOS.

Basically a USB to I2S or SPDIF converter.

A couple of these interfaces can be found here.

Transfer modes

Data is exchanged over USB using one of the four possible modes:

  • Control Transfers: command and status operations,
  • Interrupt Transfers: device requires the attention of the host
  • Bulk Transfers: large volumes of data like print jobs
  • Isochronous Transfers: time sensitive information, such as an audio or video stream
    • Guaranteed access to USB bandwidth.
    • Bounded latency.
    • Stream Pipe – Unidirectional
    • Error detection via CRC, but no retry or guarantee of delivery.
    • Full & high speed modes only

Transfer modes explained in detail.

Isochronous transfer

When the computer sends the audio stream to an USB port, if first reads the data from the hard disk and caches blocks of the data in memory.

It is then spooled from memory to the output port in a continuous stream (Isochronous mode).

Frames are sent out every millisecond.
This happens whether there is any data in the frame or not.
The rate at which the frames go out is determined by a oscillator driving the USB bus.
This rate is independent of everything else going on in the PC.
In principle this guarantees a constant flow of the frames.
In practice the frames might not be filled properly with data because some program simply hogs the CPU or the PCI.
Anti virus polling the internet at high priority are a well known example.


Isochronous transfer can be done with three possible types of synchronization modes in the USB audio device.

Synchronous, adaptive and asynchronous synchronization

There must be some kind of synchronization between the PC and the DAC to avoid buffer under/overrun.

Synchronous

The clock driving the DAC is directly derived from the 1 kHz frame rate.
This mode was used by the early USB audio devices.
They were limited to 48 kHz and pretty jittery.

Adaptive

In this mode the timing is generated by a separate clock.
A control circuit (sample rate guesser) measures the average rate of the data coming over the bus and adjusts the clock to match that.
Since the clock is not directly derived from a bus signal it is far less sensitive to bus jitter than synchronous mode, but what is going on the bus still can affect it.
It’s still generated by a PLL that takes its control from the circuits that see the jitter on the bus.

adaptive1

Asynchronous

In this mode an external clock is used to clock the data out of the buffer and a feedback stream is setup to tell the host how much data to send.

A control circuit monitors the status of the buffer and tells the host to increase the amount of data if the buffer is getting too empty or to decrease if it’s getting too full.
Since the readout clock is not dependent on anything going on with the bus, it can be fed directly from a low jitter oscillator, no PLL need apply.
This mode can be made to be very insensitive to bus jitter.

async1


The warm reception in the audiophile world of asynchronous USB as developed and promoted by Wavelength inspired other brands to offer asynchronous USB DACs .


Asynchronous mode is not better by design but by implementation because you can implement a top quality (low jitter) clock in the DAC.

There is actually a good example of this case of its the implementation of the clock thats important, not the asyncness itself that is important. The recent inexpensive Musiland devices use an asynchronous protocol but then use a frequency synthesizer to generate the local clock rather than use a fixed frequency oscillator. The result is jitter that is actually worse than some of the better adaptive implementations!

John Swenson

The best way to get the most out of a dac chip is to put 2 audio oscillators right next to the dac chip. Buffer the oscillators and send them back to the USB controller to use to create the I2S (or other audio data stream L/R justified, DSP whatever) and this will give you the best response and the lowest jitter.


What many companies are doing is using the Frequency Synthesizer to create the audio oscillators. Basically these are frequency multipliers that can create any frequency and in the case of the TAS1020 down to 4Hz resolution. The problem with a Frequency Synthesizer is that the jitter can be as much as 100x that of a fixed oscillator. When enabling the oscillator in the TAS1020 also adds noise to the audio data stream because of the noise it fixes to the power supplies.


So choose wisely what you buy and ask the correct questions.

It’s not about the code… though all of ours is different, it may have an effect on the sound. But more so it has to do with the hardware and how that functions.

Thanks
J. Gordon Rankin


Not everybody agree that asynchronous is better.

Centrance, manufacturer of adaptive mode solutions, is one of them.

Some manufacturers may lead you to believe that Asynchronous USB transfers are superior to Adaptive USB transfers. This no more true than saying that you “must” hold the fork in your left hand. If you know what you are doing, you will feed yourself with either hand.

Michael Goodman, Chief Product Architect

Async USB provides a simpler way to implement a low jitter DAC relative to adaptive mode USB. For the cost of a small number of lines of firmware code, you reduce the amount and complexity hardware needed and potentially reduce the cost of the hardware needed for a high quality result. Most thinking engineers appreciate simplicity and the potential for low cost designs that deliver the goods.

You can find plenty of bovine excrement in the marketing of all kinds of high-end gear. Marketing products using buzz words without supporting detail or test results works when the audience is technically ignorant.

Old Listener

The perfect solution

Asynchronous USB looks to be the perfect solution.
You configure your PC for bit-perfect output and the DAC takes care of the timing totally independent of the timing of the PC.
But there are posts on the Internet claiming that even in case of an async USB DAC what is happening upstream is still affecting sound quality.


Almost all recent offerings of quality DACs have asynchronous USB input.


One issue with USB is that it sends regular bursts of info like the start of frame packet – “The SOF packet consisting of an 11-bit frame number is sent by the host every 1ms ± 500ns on a full speed bus or every 125 µs ± 0.0625 µs on a high speed bus”. If the timing of this shifts or is variable, this could elicit a different & variable reaction from the USB receiver & translate into a different & varying jitter or noise spectrum. Making the PC end as solid & stable as possible without undue processing could be one factor in ameliorating this variation. It might not be the low level of jitter that we notice but the variation in jitter – that’s one reason why I say that the measurements we currently run seem not to be capable of picking up these issues or we are not directing them to the correct target for measuring.

Jkeny

Vendor specific

Some companies don’t use USB audio in isochronous transfer mode.
They implement their own solution using bulk mode transfer.
Bulk mode is asynchronous by design.

As it is bulk mode,

  • No guarantee of bandwidth or minimum latency
  • Error detection via CRC, with guarantee of delivery.

In case of isochronous mode it is exactly the reverse.

As long as the DAC is the only one connected to an internal hub, bandwidth is in general not the problem using USB high speed mode.


Inherent to a vendor specific solution is that he either supports your OS or not.
The advantage of USB audio is that it is natively supported by Win, OSX and Linux.
However in case of USB audio class 2 on Win you need a third party driver too.

Anyway this solution does audio over the USB without using the USB audio of the operating system.


Measurement

Jim Lesurf did a nice experiment.
He measured the analog out of a DAC Magic when feed by its own adaptive mode USB and by a asynchronous USB to SPDIF converter (Halide).

The differences between adaptive (USB direct) and asynchronous (Halide) are clear.

According to the author not only measurable but also audible. [5]

Archimago [11] measured the jitter performance of a adaptive mode USB and a async mode.

adaptive mode USB


Asynchronous mode USB (CM6631A

Indeed, the jitter performance improves with asynchronous USB

USB cables

Cable length between full speed devices is limited to 5 meters. For a low speed device the limit is 3 meters.

As the signal degrades proportional to the length of the cable, a short cable is often recommended.

Other says this can put a source of RFI (the PC) to close to the USB-DAC.

Audiophile USB cables

As file based audio is gaining momentum and many believe asynchronous USB the way to go there is a growing market for audiophile grade USB cables.

The question of course is why a cable can have any impact on sound quality.
Some say that improved jitter performance of a cable can make a difference.
Others say that the reason we use asynchronous USB is exactly to have zero input jitter at the DAC so all what is happening upstream is irrelevant cable included.[1]
Audiophile USB cables are becoming as controversial as high-end power cords.

The Limitations of digital audio processors and cables create timing errors known as jitter, which remove portions of the audio signal and replace them with noise and distortion. Cables tend to round off the square waveforms of the signal, making them less clear to the processor, thus increasing jitter. This rounding effect varies greatly among cables and a truly superior digital audio cable can make great improvements in sound quality.
http://www.wireworldcable.com/categories/usb_cables.html


Another manufacturer talking some marketing bull shit?
They do have a point.
Digital is indeed sending fully analogue electrons over a wire.
And indeed, the block pulse degrades with the length.
A good digital cable is one who minimizes this degradation.

The USB 2.0 specification lists a maximum cable length of 5 meters (~15 feet). This is marginal with the best of cables, and many “audiophile grade” cables will run into problems even with far shorter lengths. There have been many credible reports of improved sound quality with some cables, but these have almost all been in systems using Class 1 Audio, with a maximum data rate of 12 MHz. When the data rate is boosted by a factor of 40x to 480 MHz, there are very few “audiophile” cable companies that have the tools and experience to ensure good results.
Computer Audio Playback Overview – Ayre

This is an easy test.
Connect your high speed USB device, e.g. a hard disk using your audiophile grade USB cable. If hi-speed mode (480 Mbps instead of 12 Mbps, the old USB 1 standard) fails, it is a bad DIY digital cable not even compliant with USB 2 standards.

Configuring

A clear and well written step by step guide to setup and USB DAC using XP, Vista or OSX can be found at the Ayre website.

Setup for Win7.

Setup for Vista.

Check

You can check if your asynchronous USB DAC is really asynchronous.
Audio devices supporting asynchronous transfer mode should have an extra ‘endpoint descriptor’ with
bmAttributes = 0x5 (USB_ENDPOINT_TYPE_ASYNCHRONOUS).

Svyr has more

A simple way to find out is to use the Thesycon USB Descriptor Dumper

Drop out.

Some users complain about dropouts when playing USB audio.

This might be due to different devices sharing the same USB-Hub.

If your audio and your graphics card are on the same hub, the bandwidth required by the graphics might cause the audio to stutter.

Anti-virus programs polling the internet with high priority might interrupt the audio too.

Trouble shooting

Trouble shooting USB audio is covered here.

References
  1. Universal Serial Bus – usb.org
  2. USB audio spec and jitter – John Swenson
  3. How USB Works – Tech-Pro.net
  4. USB in a NutShell – Byond Logic
  5. Time for a change? – Jim Lesurf
  6. Universal Serial Bus Device Class Definition for Audio Devices 1 – Universal Serial Bus (1998)
  7. Universal Serial Bus Device Class Definition for Audio Devices 2 – Universal Serial Bus (2006)
  8. USB audio standards – Computer Audio Asylum
  9. How can USB performance impact audio quality? – Computer Audio Asylum
  10. Confirming whether your DAC is asynchronous as claimed or not – svyr
  11. MEASUREMENTS: Adaptive AUNE X1, Asynchronous “Breeze Audio” CM6631A USB, and Jitter – Archimago’s Musings
  12. USB made simple – MQP Electronics Ltd
  13. Fundamentals of USB Audio – Henk Muller, Principal Technologist XMOS Ltd. -June 27, 2012
  14. CYCLIC REDUNDANCY CHECKS IN USB – USB Implementers Forum
Read More

Computer Audio

جمعه 15 جولای 2016
/ / /

نتایج من تا این لحظه (بعد از 30 ساعت مطالعه) این بوده در عمل بهترین گزینه USB هست (دقت کنید فقط USB 2 و USB 3 خوب هستند و گزینه USB1 مناسب نیست) بصورت Asynchronous و استفاده از یه کابل خوب مثل پیوریست و اینکه استفاده از ری کلاکر و واسط های حذف نویز اصلا خوب نیست. بهتره از مک استفاده بشه با نرم افزار بیت پرفکت Audirvana با تنظیمات مربوط. کل دیتای فایل موزیک باید تو حافظه باشه.

بعضی ها معتقدند بهتره از Toslink اپتیک برای ایزوله کردن استفاده کنیم که من حس میکنم راه حل USB (با پیشرفت بیشتر USB در آینده) راه حل بهتری خواهد بود. خود تورستن هم میگه این راه حل خیلی Jitter داره و اصلا خوب نیست.

راه دیگه هم Firewire هست که عملا نه DAC سازان رفتند سمتش و نه تو مک بوک خیلی بهش توجهی شده. این راه حل خوبه اما خیلی برای ماها عملی نیست و بیشتر بدرد استودیوها میخوره و برای پهنای باند بالا خوبه. راه حل PC با کارت صدای AES یا Firewire و سیستم لینوکس هم خیلی در موردش به نتایجی کسی نرسید که بخواد توضیحی به ما بده. عملا بهترین حالت استفاده از پورت یو اس بی MAC هست با Audirvana. خوبی دیگر Usb نسبت به Firewire در سادگی و نداشتن درایور هم هست.

هارد چه SSD چه معمولی خیلی فرقی روی ماجرا ندارند اما SSD کمی بهتره. برق یا باطری روی کامپیوتر مهمه و خودم ترجیح میدم از یک Power Supply خوب استفاده کنم.

موضوعی که مهمه اینه که تو انتخاب DAC باید به نکات زیر دقت کنیم :

  • اون DAC حتما ورودی USB 2.0 یا USB 3.0 داشته باشه
  • ورودی USB مبدل DAC حتما باید حالت Asynchronous گوردون داشته باشه مثل Wavelength یا Ayre یا Berkeley USB Alpha
  • باید ورودی USB اون DAC سیگنال رو مستقیما به چیپ DAC برسونه و نیاد اول به SPDIF تبدیلش کنه چون کل ارزش USB به همون Jitter کم Asynchronous mode هست و اگر بخواد تبدیل به SPDIF بشه دیگه کار خراب میشه.

دقت کنید نقش کابل USB برای کاهش نویز از PC به DAC بسیار مهمه.

از سایت رومی این لینک رو دیدم که مصاحبه های سال 2013 هست.


http://www.positive-feedback.com/Issue41/ca_intro.htm

Larry Moore and Eric Hider of Ultra Fi Audio Designs

Andreas Koch of Playback Designs

Tony Lauck

Steve Nugent of Empirical Audio

Gordon Rankin of Wavelength Audio

Jon Reichbach of Sonic Studio/Amarra

Vinnie Rossi of Red Wine Audio

John Stronczer of Bel Canto Designs

Daniel Weiss of Weiss Digital Audio

Vincent Sanders and John Hughes of VRS Audio Solutions

Kent Poon of Design w Sound

Charles Hansen of Ayre Acoustics

Pete Davey of Positive Feedback Online

رومی میگه جای نظرات Dan Lavry,  Ed Meitner, Michael Ritter and Pflash Pflaumer هم خالیه. شرکت های Lavry Engineering و  EMM Labs و berkeley audio design .

Read More